

Aug. 5, 2021
As someone who is learning both Wagtail and Django at the same time, one of the harder things I've had to figure out for my projects has been when to rely on Wagtail and when to rely on Django. One thing that has surprised me as I've delved deeper into these frameworks is that Wagtail and Django coexist quite beautifully. For example, you can actually still access the Django admin in addition to the Wagtail admin, you just navigate to /django-admin instead of /admin.
So as tempting as it can be to build every single thing into a Wagtail page (because let's be honest, Wagtail is WAY prettier than Django), there are sometimes when the Django approach is the better way to handle a feature or function than the Wagtail approach. The general rule of thumb I've used for figuring it out is: Do I want non-developer users to be able to make changes to this form, feature or page? If the answer is yes, then Wagtail is the way to go. If the answer is no, then so far I've found that Django is the better bet.
Django already has a robust user authentication system built into it. Wagtail tapped into that system to create a great setup for the users who produce and publish the website content within Wagtail. Unlike Wordpress or Joomla or other content management systems though, Wagtail leaves it up to developers to decide how to handle authentication for the users who are visiting the site. This provides great flexibility but can also be a bit hard to navigate for folks who are used to a CMS having self-service frontend authentication features right out of the box.
Ideally, frontend users would never touch the admin interface whatsoever. The design of the admin is almost always very different from the frontend of the site and we don't want to make users feel like they've taken a wrong turn with a sudden design switch.
Fortunately, it's not too hard to get a basic frontend login authentication set up using what Django and Wagtail already have built in. Let's dig in and give this a go.
I find that starting a new Wagtail project from scratch isn't always the best way to learn, especially for content management systems. Fortunately, the Wagtail maintainers have given us a glorious demo site called the Wagtail Bakery. I modified the bakery a bit to add a custom user model because custom user models are pretty much an absolute must-have if you're planning to do anything special with user authentication.
The starting code is available on Github here: https://github.com/vossisboss/bakerydemo-user-model
Let's walk through how to set up your bakery demo site with virtualenv.
First, you'll want to use these commands to create a virtual environment and load the data into your bakery demo site:
mkvirtualenv bakeryvenv
source bakeryvenv/bin/activate
git clone https://github.com/vossisboss/bakerydemo-user-model.git
cd bakery-demo-user-model
pip install -r requirements/base.txt
python manage.py migrate
python manage.py load_initial_data
python manage.py runserver
For this tutorial, I'll be relying on the sqlite database that comes out of the box with Wagtail. You're welcome to switch things up to Postgres or any other database you prefer. If you encountered no errors, then you should see a page full of breads when you navigate to http://127.0.0.1:8000/ in your browser. If you see yummy bread, great! If you don't, visit the page for Wagtail Bakery repo to find some tips for troubleshooting common issues. One thing most folks tend to miss is having multiple versions of Python on their machines.
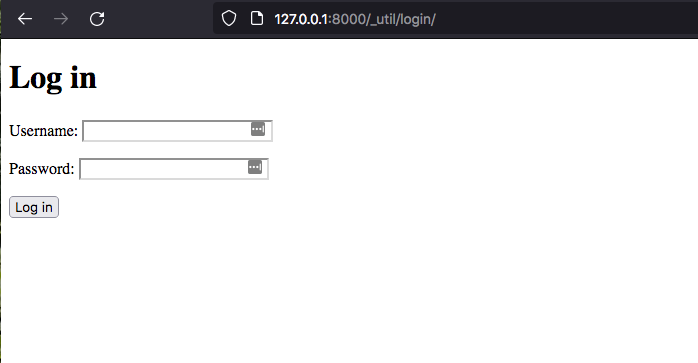
What can be hard to figure out based on the Wagtail documentation is that Wagtail actually does have a built-in frontend login template. If you navigate to http://127.0.0.1:8000/_util/login, then you'll find this:
Now that URL is a bit ugly and not the most ideal one to have for a login page. To change that, we would have to create a custom view. For this tutorial though, we're going to just be cool with the URL ugliness and proceed with customizing the template. If I'm feeling ambitious, perhaps I'll cover the custom view option in another tutorial. First, let's have a look at the code that ships with Wagtail for this template.
{% load i18n %}
<!DOCTYPE HTML>
<html>
    <head>
        <title>{% trans "Log in" %}</title>
    </head>
    <body>
        <h1>{% trans "Log in" %}</h1>

        {% if form.errors %}
            <p>{% trans "Your username and password didn't match. Please try again." %}</p>
        {% endif %}

        {% if next and request.user.is_authenticated %}
            <p>{% trans "Your account doesn't have access to this page. To proceed, please log in with an account that has access." %}</p>
        {% endif %}

        <form method="post" action="{% url 'wagtailcore_login' %}">
            {% csrf_token %}
            {{ form.as_p }}
            <input type="submit" value="{% trans "Log in" %}" class="button" />
            <input type="hidden" name="next" value="{{ next }}" />
        </form>
    </body>
</html>
Definitely nothing fancy happening here. So let's see if we can make this page match the rest of the bakery site better. Create a directory in the templates folder called users to match the users app. You're welcome to put it somewhere else that makes sense to you, just make sure your file paths line up. Then create a file called login.html in that new directory. Copy and paste the above into login.html. Change a word or two in the h1 tag if you want to confirm the template has been updated. Then add the following setting to your base.py file:
WAGTAIL_FRONTEND_LOGIN_TEMPLATE = 'users/login.html'Next, let's make this template look more like the rest of the bakery site by adding in some of the snippets and styles that already exist. Replace all of the code in your login.html file with the following code.
{% extends "base.html" %}
{% load i18n %}
{% load navigation_tags wagtailimages_tags %}

{% block content %}

<div class="container">
    <div class="row">
        <div class="col-md-8">
            <h1>{% trans "Log in" %}</h1>

            {% if form.errors %}
            <p>{% trans "Your username and password didn't match. Please try again." %}</p>
            {% endif %}

            {% if next and request.user.is_authenticated %}
            <p>{% trans "Your account doesn't have access to this page. To proceed, please log in with an account that
                has access." %}</p>
            {% endif %}

            <form method="post" action="{% url 'wagtailcore_login' %}">
                {% csrf_token %}
                {{ form.as_p }}
                <input type="submit" value="{% trans " Log in" %}" class="button" />
                <input type="hidden" name="next" value="{{ next }}"/>
            </form>
        </div>
    </div>
</div>


{% endblock content %}
Now you should see the Wagtail Bakery navigation menu, and the styles of the login form should match the rest of the Wagtail Bakery page.
Now that we have things all polished up a bit, let's try logging in. The bakerydemo comes with an admin user already created with the oh-so-clever username of admin and the password changeme.
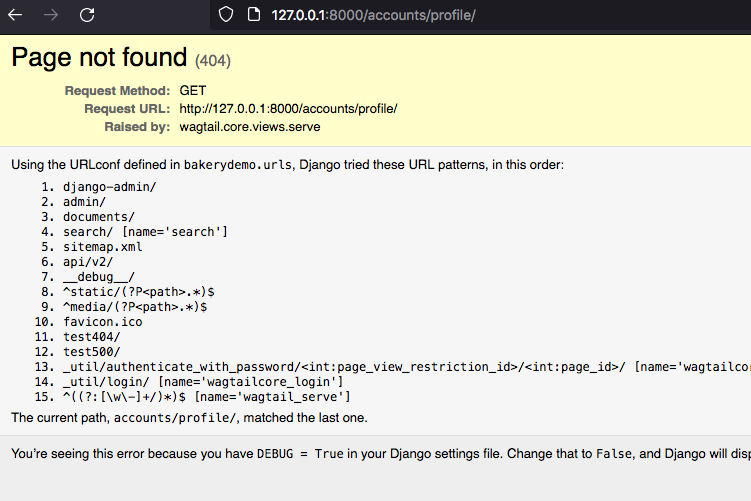
Uh oh, we got at 404 over here! Don't worry, there's nothing wrong with the user credentials. The frontend login page takes us to an accounts/profile page that doesn't exist. I'm going to cover creating an account profile page in another tutorial, so rather than create that page straight away, let's focus on getting the logging in and out from the front end functional. Go to your base.py file and add the following setting.
LOGIN_REDIRECT_URL = '/'Now return to your login page and try logging in again. When you log in, you should be taken straight to the home page of the Wagtail Bakery site. This is definitely much better than 404, but right now there's no way to tell if you're logged in or not. We need to signal to the user that they are logged in and give them a chance to log out. To do that, we can add some code to the home page to show the user that they are logged in.
Go to the templates/includes directory and find the header.html file. Add the following code snippet after line 38 in header.html.
<div class="row">
    {% if request.user.is_authenticated %}
        <h3 style="color:#ffffff;">Hello {{ request.user.username }}</h3>
    {% else %}
        <a href="/_util/login"><button>Log In</button></a>
    {% endif %}
</div>
Now since this isn't a design tutorial, what you'll see isn't all that pretty (and it's definitely not mobile friendly). But let's worry about the pretty later and have a look at what this code is doing. Essentially, the code is checking if the user is logged in. If they are, they will received a "Hello" greeting on the homepage. If you're using the admin user as a test, then it should say "Hello admin". If the user isn't logged in, then there will be a "Log In" button that takes the user to the log in page we just created. That works well for getting users logged in, but how about getting them logged out?
Wagtail comes with a built-in login view for the frontend but not a built-in logout view. This is where we're going to have to look to Django to help us out with the views we need to get our users logged out properly. Wagtail automatically comes with django.contrib.auth installed in the base.py file. But the paths for the authentication URLs are not automatically included in Wagtail. So go add this line to urlpatterns in your urls.py file.
path('accounts/', include('django.contrib.auth.urls')),Now that we have the default Django authentication urls added, we can access the default views and templates through Django. Let's update the code we added to the header.html file to give users a link for logging out.
<div class="row">
    {% if request.user.is_authenticated %}
        <h3 style="color:#ffffff;">Hello {{ request.user.username }}</h3>, <a href="{% url 'logout' %}">Logout?</a>
    {% else %}
        <a href="/_util/login"><button>Log In</button></a>
    {% endif %}
</div>
With that code added, now you should see a line that says "Hello admin, Logout?". But if you click on the logout link, you'll be greeted with this view here:
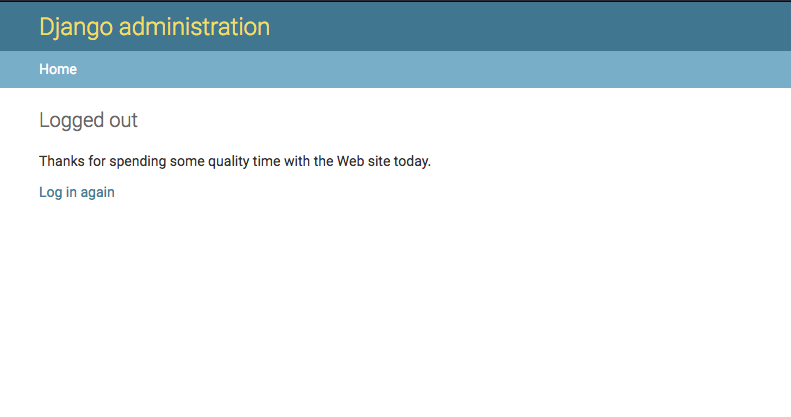
Sending users to a view with a completely different design is pretty jarring and not the best user experience. So rather than sending people to a completely separate page, we're going to take advantage of a redirect setting to make this whole setup a bit more user friendly. Go to base.py and add the following setting beneath the LOGIN_REDIRECT_URL setting.
LOGOUT_REDIRECT_URL = '/'Now when a user clicks the "Log out" link, they won't be taken to some random view. Instead, they will be redirected to the home page where the "Log in" button is now displayed. Then they can log in and log out all day long at their whim without ever having to touch the admin section of the site.
This is clearly not the only piece of a fully functioning authentication system that we'll need. Users will need a way to sign up, change passwords and update their email or other preferences. I'll be covering those topics in future tutorials, so stick around for more adventures in Wagtail authentication.